description: Explore the best practices and technical details for managing authorization in Zeeve’s cloud-based platform. Learn how to secure your data and control access to resources with our API and tools.
Cloud Authorizations
Zeeve allows you to authorize multiple cloud accounts of yours so as to create networks in the cloud of your choice. You may choose to deploy some nodes of network on one cloud and extend some nodes of the same on another. This cross cloud deployment maybe a major requirement for your usecase or clients especially for creating/expanding consortiums.
Zeeve supports a list of cloud for you to choose from. You can authorize multiple clouds and choose between them at the time of creating networks or nodes. Following is the list of currently supported clouds:-
AWS
Digital Ocean
Google Cloud
Tencent Cloud
INTERESTING FACT: Zeeve doesn’t use blockchain services of any of the supported cloud platforms, and hence is not restricted for the level of features it can provide for a protocol on any cloud.
AWS Authorization
Configuration on AWS Portal
Before you authorize your AWS account with Zeeve, you’ll need following provide IAM permissions to deploy a network:
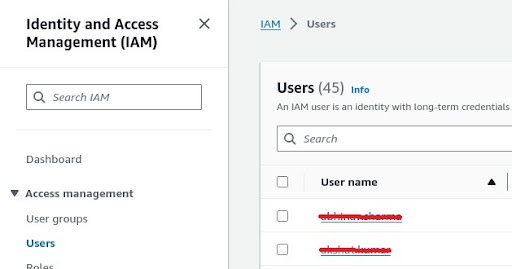
Login into the AWS console, go to IAM service by clicking Security Credential on the upper right corner.

Select the User for which needs to be authorized on the Zeeve platform.
Click on Add Permissions button, and Create Inline Policy.

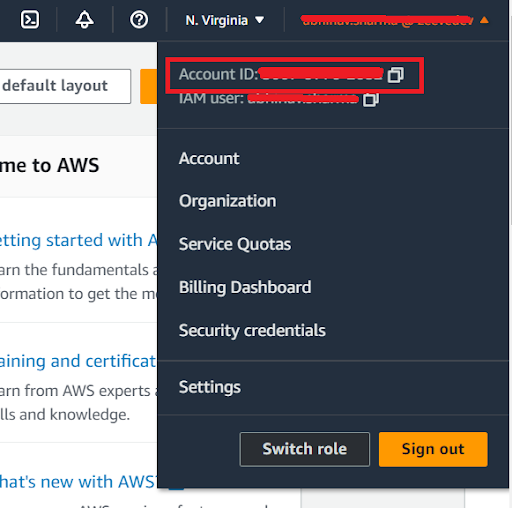
Copy the ACCOUNTID from the upper-right corner (we will need this Account ID in Further Steps).
Click on the JSON button, and add the below mentioned policy, (Please do replace ACCOUNTID with your AWS Account ID)
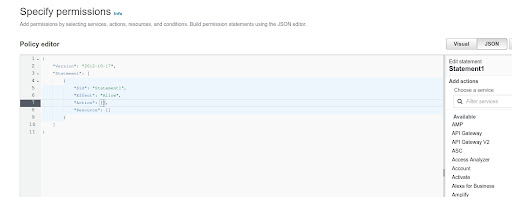
Write the Policy:
{
   "Version": "2012-10-17",
   "Statement": [
       {
           "Effect": "Allow",
           "Action": [
               "logs:CreateLogStream",
               "logs:TagLogGroup",
               "logs:DeleteLogGroup",
               "logs:TagResource",
               "logs:PutRetentionPolicy",
               "logs:CreateLogGroup",
               "logs:DeleteDestination",
               "logs:TagResource",
               "logs:ListTagsLogGroup"
           ],
           "Resource": [
               "arn:aws:logs:*:ACCOUNTID:destination:*",
               "arn:aws:logs:*:ACCOUNTID:log-group:*"
           ]
       },
       {
           "Effect": "Allow",
           "Action": [
               "logs:DescribeLogGroups",
               "logs:DescribeDestinations"
           ],
           "Resource": "*"
       },
       {
            "Effect": "Allow",
            "Action": [
                "iam:GetPolicyVersion",
                "iam:GetPolicy",
                "iam:GetUserPolicy",
                "iam:ListAttachedUserPolicies",
                "iam:ListUserPolicies",
                "iam:GetUser"
            ],
            "Resource": [
                "*"
            ]
        }
   ]
}
Name this policy as Zeeve-IAM-Policy, and click Save.
Grant AWS Managed EC2 Permissions:AmazonEC2FullAccess. a. Click on Add Permissions -> Add Permissions
b. Click on Attach Policies Directly and Search for AmazonEC2FullAccess.
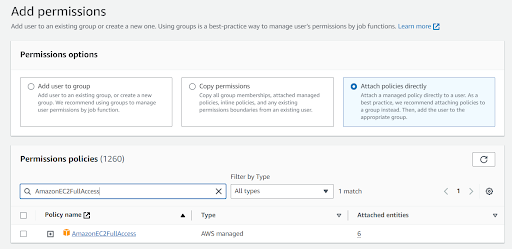
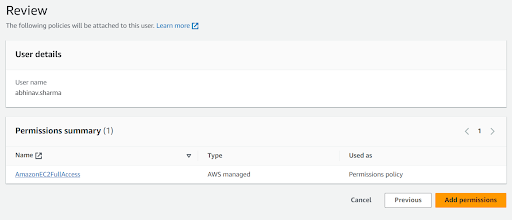
c. Select the permission and Click on Next.
d. On the Review Page, Review the Policy and Click on Add Permissions.
(Only Permissive Protocol) Grant below permissions for Permissive protocols.
{
   "Version": "2012-10-17",
   "Statement": [
       {
           "Effect": "Allow",
           "Action": [
               "elasticfilesystem:CreateFileSystem",
               "eks:ListClusters",
               "eks:DescribeAddonVersions",
               "eks:RegisterCluster",
               "eks:CreateCluster"
           ],
           "Resource": "*"
       },
       {
           "Effect": "Allow",
           "Action": [
               "elasticfilesystem:DescribeMountTargets",
               "elasticfilesystem:DeleteAccessPoint",
               "elasticfilesystem:CreateMountTarget",
               "elasticfilesystem:DescribeLifecycleConfiguration",
               "elasticfilesystem:DescribeFileSystems",
               "elasticfilesystem:DeleteMountTarget",
               "elasticfilesystem:CreateAccessPoint",
               "elasticfilesystem:DeleteFileSystem",
               "elasticfilesystem:DescribeMountTargetSecurityGroups",
               "elasticfilesystem:TagResource"
           ],
           "Resource": [
               "arn:aws:elasticfilesystem:*:ACCOUNTID:file-system/*",
               "arn:aws:elasticfilesystem:*:ACCOUNTID:access-point/*"
           ]
       },
       {
           "Effect": "Allow",
           "Action": "eks:*",
           "Resource": [
               "arn:aws:eks:*:ACCOUNTID:cluster/*",
               "arn:aws:eks:*:ACCOUNTID:nodegroup/*/*/*",
               "arn:aws:eks:*:ACCOUNTID:fargateprofile/*/*/*",
               "arn:aws:eks:*:ACCOUNTID:addon/*/*/*",
               "arn:aws:eks:*:ACCOUNTID:identityproviderconfig/*/*/*/*"
           ]
       },
       {
           "Effect": "Allow",
           "Action": [
               "secretsmanager:CreateSecret",
               "secretsmanager:UpdateSecret",
               "secretsmanager:DescribeSecret",
               "secretsmanager:GetSecretValue",
               "secretsmanager:PutSecretValue",
               "secretsmanager:ReplicateSecretToRegions",
               "secretsmanager:TagResource"
           ],
           "Resource": [
               "*"
           ]
       },
       {
           "Effect": "Allow",
           "Action": [
               "iam:GetRole",
               "iam:UpdateAssumeRolePolicy",
               "iam:GetPolicyVersion",
               "iam:GetPolicy",
               "iam:DeletePolicy",
               "iam:CreateRole",
               "iam:DeleteRole",
               "iam:AttachRolePolicy",
               "iam:CreateOpenIDConnectProvider",
               "iam:CreatePolicy",
               "iam:ListInstanceProfilesForRole",
               "iam:PassRole",
               "iam:DetachRolePolicy",
               "iam:ListPolicyVersions",
               "iam:ListAttachedRolePolicies",
               "iam:ListRolePolicies",
               "iam:GetOpenIDConnectProvider",
               "iam:DeleteOpenIDConnectProvider"
           ],
           "Resource": [
               "arn:aws:iam::ACCOUNTID:policy/*",
               "arn:aws:iam::ACCOUNTID:oidc-provider/*",
               "arn:aws:iam::ACCOUNTID:role/*"
           ]
       }
   ]
}
Follow steps 5-7, and Name this Policy as Zeeve-Permissive-Protocol-Policy.
(Only Corda Enterprise) Grant below permissions for Corda Enterprise.
{
    "Version": "2012-10-17",
    "Statement": [
        {
            "Effect": "Allow",
            "Action": [
            	"route53:GetHostedZone",
            	"route53:CreateHostedZone",
                "iam:CreateInstanceProfile",
                "iam:DeleteInstanceProfile",
                "iam:GetInstanceProfile",
                "iam:TagRole",
                "route53:GetChange",
                "route53:ChangeResourceRecordSets",
                "iam:RemoveRoleFromInstanceProfile",
                "iam:PutRolePolicy",
                "route53:ListTagsForResource",
                "iam:AddRoleToInstanceProfile",
                "route53:ListTagsForResources",
                "iam:DeleteRolePolicy",
                "route53:ListResourceRecordSets",
                "route53:AssociateVPCWithHostedZone"
            ],
            "Resource": [
                "arn:aws:route53:::hostedzone/*",
                "arn:aws:route53:::healthcheck/*",
                "arn:aws:route53:::change/*",
                "arn:aws:iam::ACCOUNTID:role/*",
                "arn:aws:iam::ACCOUNTID:instance-profile/*",
            ]
        },
        {
            "Effect": "Allow",
            "Action": [
            	"kms:PutKeyPolicy",
            	"kms:DescribeKey",
            	"kms:CreateGrant",
                "kms:EnableKeyRotation",
                "kms:Decrypt",
                "kms:GetKeyRotationStatus",
                "kms:GenerateDataKey",
                "route53:DeleteHostedZone",
                "kms:GenerateDataKeyPair",
                "kms:CreateGrant",
                "kms:ScheduleKeyDeletion",
                "kms:GetKeyPolicy",
                "kms:ListResourceTags",
                "kms:TagResource"
            ],
            "Resource": [
                "arn:aws:kms:*:ACCOUNTID:key/*"
            ]
        },
        {
            "Effect": "Allow",
            "Action": [
            	"ecr:DeleteRepository",
                "ecr:PutImage",
            	"ecr:DeleteRepository",
            	"ecr:TagResource",
                "ecr:ListTagsForResource",
                "ecr:UploadLayerPart",
                "ecr:CompleteLayerUpload",
                "ecr:DescribeRepositories",
                "ecr:InitiateLayerUpload",
                "ecr:BatchCheckLayerAvailability"
            ],
            "Resource": "arn:aws:ecr:*:ACCOUNTID:repository/*",
        },
        {
            "Action": "ec2:*",
            "Effect": "Allow",
            "Resource": "*"
        },
        {
            "Action": "ec2:*",
            "Effect": "Allow",
            "Resource": "*"
        },
        {
            "Effect": "Allow",
            "Action": "elasticloadbalancing:*",
            "Resource": "*"
        },
        {
            "Effect": "Allow",
            "Action": "cloudwatch:*",
            "Resource": "*"
        },
        {
            "Effect": "Allow",
            "Action": "autoscaling:*",
            "Resource": "*"
        },
        {
            "Effect": "Allow",
            "Action": "eks:*",
            "Resource": "*"
        },
        {
            "Effect": "Allow",
            "Action": [
                "rds:AddTagsToResource",
                "rds:DescribeDBSubnetGroups",
                "ecr:CreateRepository",
                "rds:DescribeGlobalClusters",
                "route53:ListHostedZones",
                "ecr:GetAuthorizationToken",
                "rds:CreateDBSubnetGroup",
                "rds:DeleteDBSubnetGroup",
                "rds:ListTagsForResource",
                "rds:CreateDBCluster",
                "rds:CreateDBInstance",
                "rds:DescribeDBInstances",
                "kms:CreateKey",
                "rds:DeleteDBCluster",
                "rds:DescribeDBClusters",
                "rds:DeleteDBInstance"
            ],
            "Resource": "*"
        }
    ]
}
Follow steps 5-7, and Name this Policy as Zeeve-Corda-Enterprise-Policy.
Configuration on Zeeve Portal
To authorize your AWS account on Zeeve:-
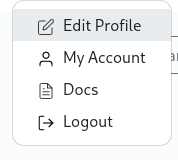
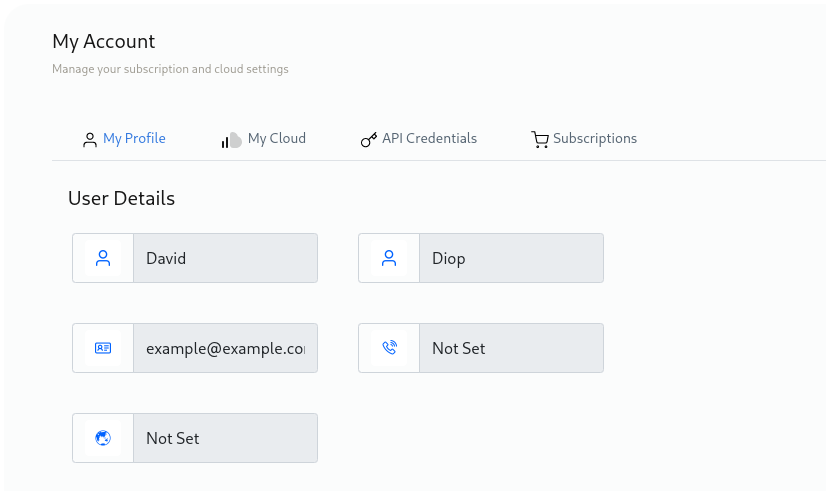
Hover on profile
Click on My Account
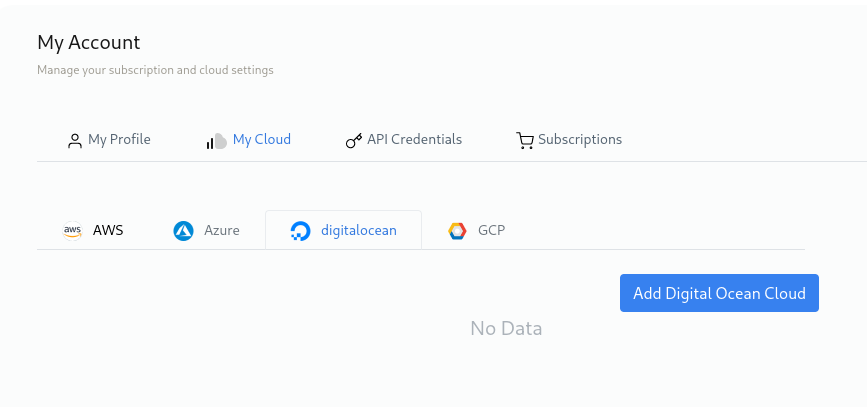
Click on My Cloud.
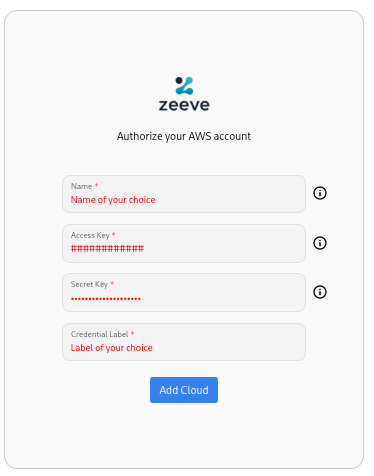
Click on AWS and then click on Add AWS Cloud.

You will need AWS Access Key and AWS Access Secret Key, to authenticate your AWS account with Zeeve.
Digital Ocean Authorization
To authorize your Digital Ocean account on Zeeve you’ll need to ensure certain things:-
User must have an account with enough permissions to create -
Project
Droplets
Kubernetes service.
Specific Scope in DO Account:
Read
Write
After which on Zeeve do following steps:-
Hover on profile
Click on My Account
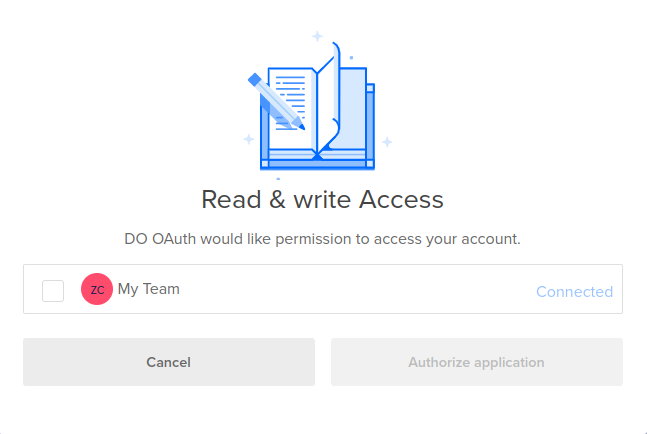
Click on your cloud authentication for Digital Ocean account, click on Authorize digital Ocean.
Click on DigitalOcean and then click on Add Digital Ocean Cloud.
Authorize DigitalOcean will redirect you to login page, you can add your DigitalOcean credentials and then click on Add Cloud.
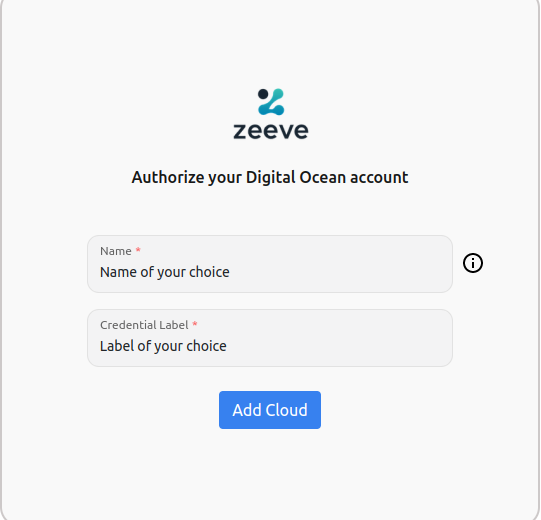
After that click on the team which you want to give access and click on Authorize Application.
GCP Cloud Authorization
To authorize your GCP account on Zeeve you’ll need to ensure certain things:-
Configuration on GCP Portal
Enable Below APIs from Google Cloud Platform:
Compute Engine API
Kubernetes Engine API
Steps to enable APIs on GCP Platform
Go to Google Cloud console: https://console.cloud.google.com/
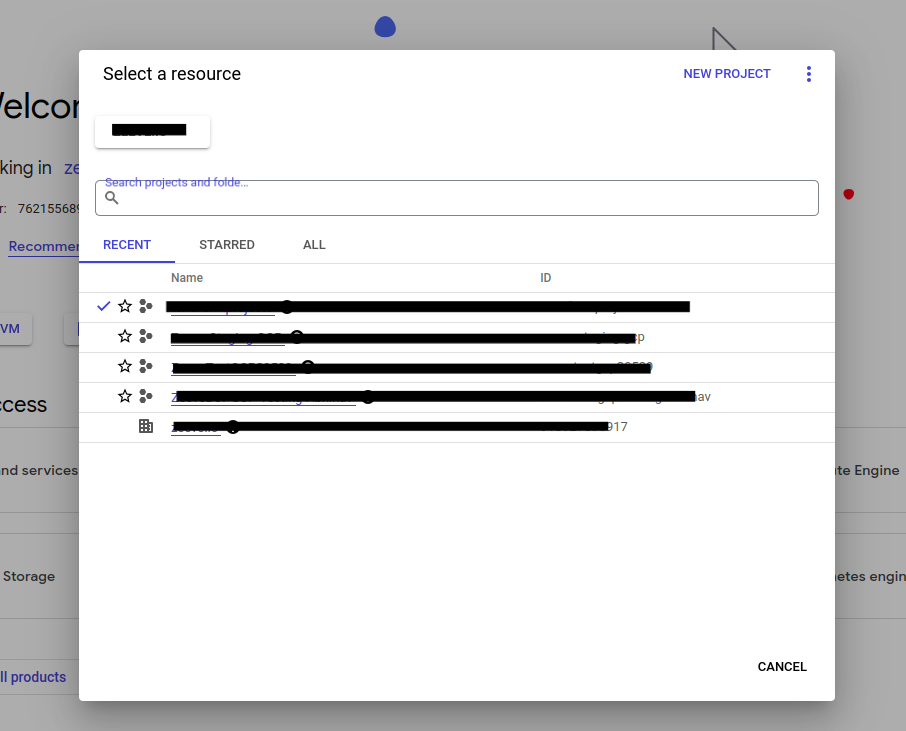
Select the project, in which you need to enable APIs.
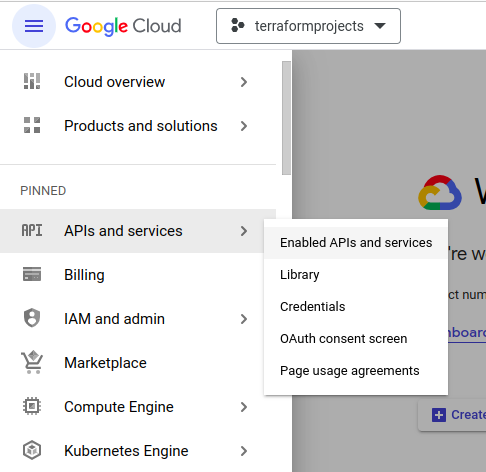
Click on APIs and services from the navigation bar and click Enabled APIs and services
Click on + Enable API and Services
Search Compute Engine API in search bar.
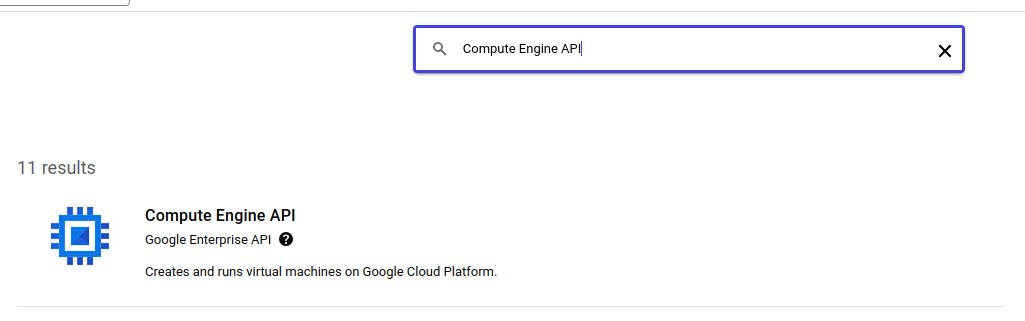
Click on Compute Engine API -> Enable/Manage Option
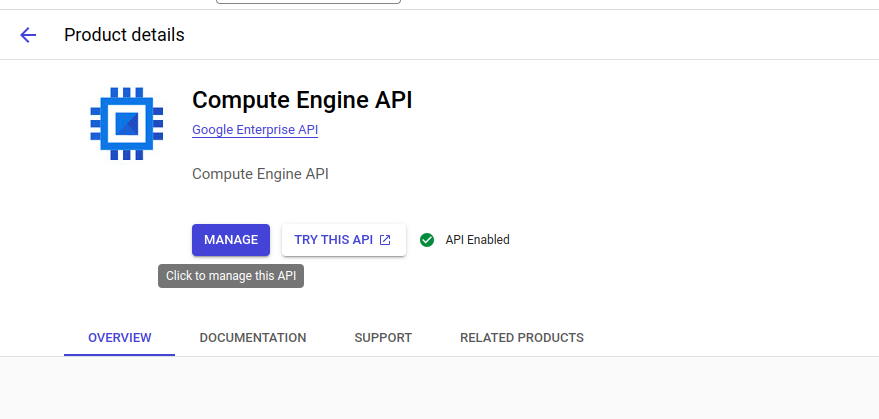
Follow 5-6 step for enabling Kubernetes Engine API.
User must have an account with enough permissions to create -
Specific Permissions in GCP Account:
‘compute.globalOperations.get’
‘compute.machineTypes.get’
‘compute.networks.create’
‘compute.networks.delete’
‘compute.networks.get’
‘compute.networks.updatePolicy’
‘compute.projects.get’
‘compute.regionOperations.get’
‘compute.regions.get’
‘compute.routers.create’
‘compute.routers.delete’
‘compute.routers.get’
‘compute.routers.update’
‘compute.routes.create’
‘compute.routes.delete’
‘compute.routes.get’
‘compute.subnetworks.create’
‘compute.subnetworks.delete’
‘compute.subnetworks.get’
‘compute.zones.list’
‘resourcemanager.projects.get’
‘compute.disks.create’
‘compute.instances.create’
‘compute.instances.get’
‘compute.instances.setMetadata’
‘iam.serviceAccounts.create’
‘iam.serviceAccounts.delete’
‘iam.serviceAccounts.get’
‘iam.serviceAccountKeys.create’
‘iam.serviceAccountKeys.delete’
‘iam.serviceAccountKeys.get’
‘iam.serviceAccounts.actAs’,
‘container.clusters.create’
‘container.clusters.delete’
‘container.clusters.get’
‘container.clusters.getCredentials’
‘container.clusters.update’
‘container.operations.get’
‘container.clusters.list’
‘container.deployments.delete’
‘container.deployments.get’
‘container.namespaces.list’
‘container.namespaces.get’
‘container.services.get’,
‘compute.disks.createSnapshot’
‘compute.snapshots.get’
‘compute.snapshots.create’
‘compute.snapshots.useReadOnly’
‘compute.snapshots.delete’
‘compute.zones.get’
‘storage.objects.create’
‘storage.objects.delete’
‘storage.objects.get’
‘storage.objects.list’
‘iam.serviceAccounts.signBlob’
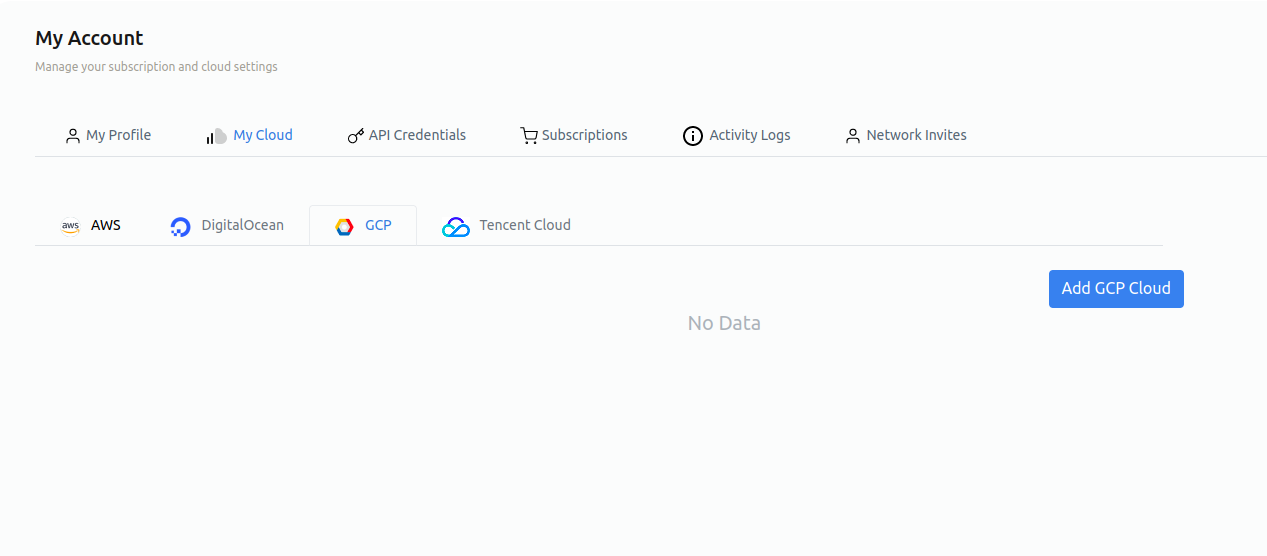
Configuration on Zeeve Portal
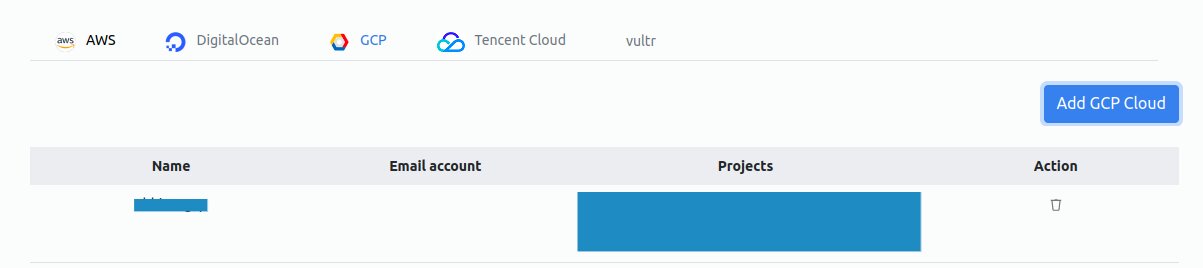
Hover on profile
Click on My Account
Click on My Cloud.
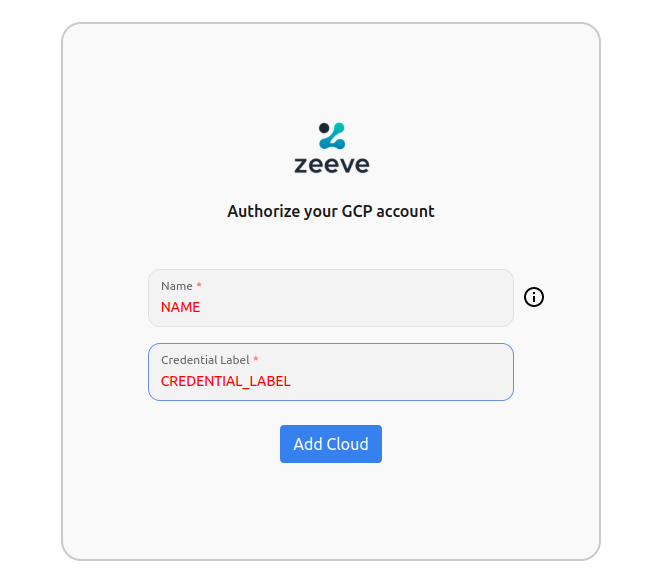
Click on GCP and then click on Add GCP Cloud.
Authorize GCP will redirect you to login page, you can add your GCP credentials and then click on Add Cloud.
Login to your Google Cloud account using Google IDP.
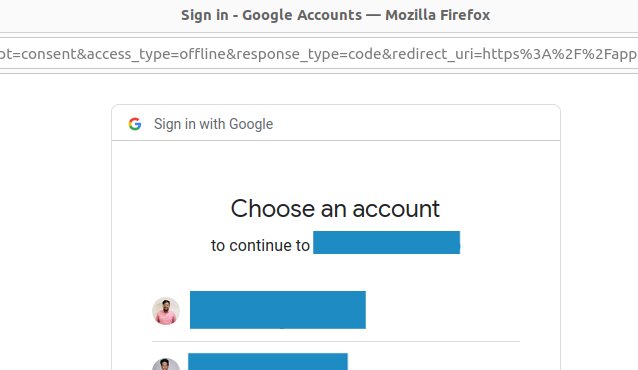
Allow Zeeve to access your GCP Account.
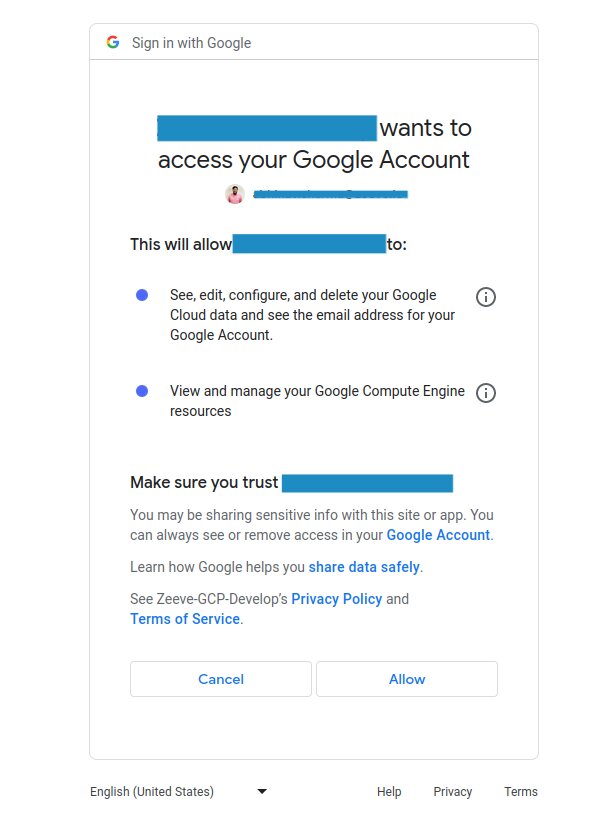
You can view your creds in Zeeve Console.
Tencent Cloud Authorization
Before you authorize Tencent Cloud on Zeeve, you will need to add Zeeve’s IDP into your Cloud account.
Creating an OIDC IdP
On the left sidebar in the CAM console, select Identity Providers > Role-Based SSO.
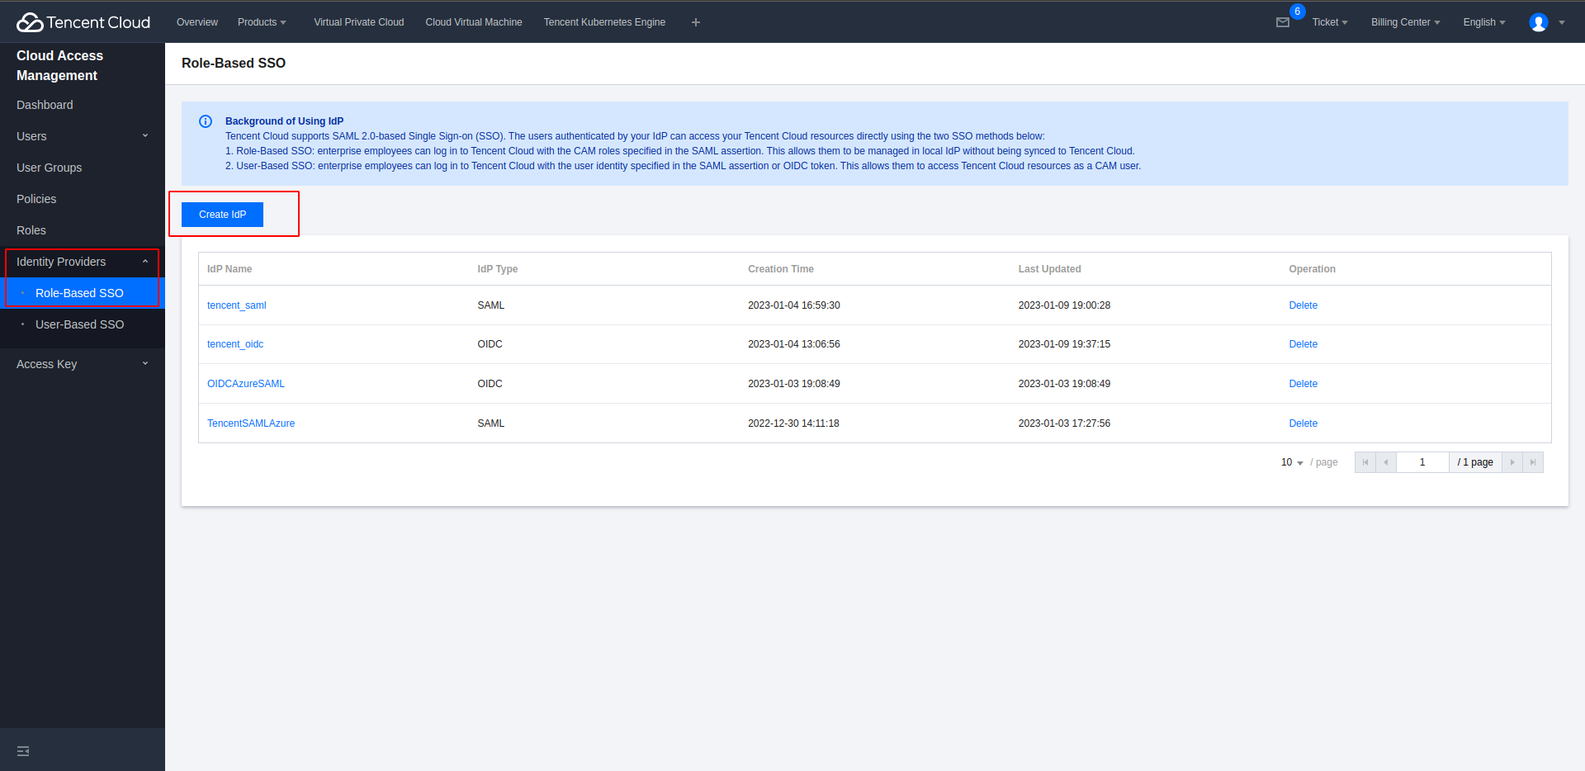
On the Role-Based SSO page, click Create IdP.
On the page you enter, select OIDC as the IdP type and enter the following IdP information.
IdP Name:zeeve_oauth
IdP URL:https://login.microsoftonline.com/9188040d-6c67-4c5b-b112-36a304b66dad/v2.0
Client ID:505b1146-13fe-4df6-927a-ca57321786fd
Public Key for Signature: For this you can click on this link (https://login.microsoftonline.com/common/discovery/v2.0/keys) then copy all the content and paste it in the column.Click Next to enter the information review page.
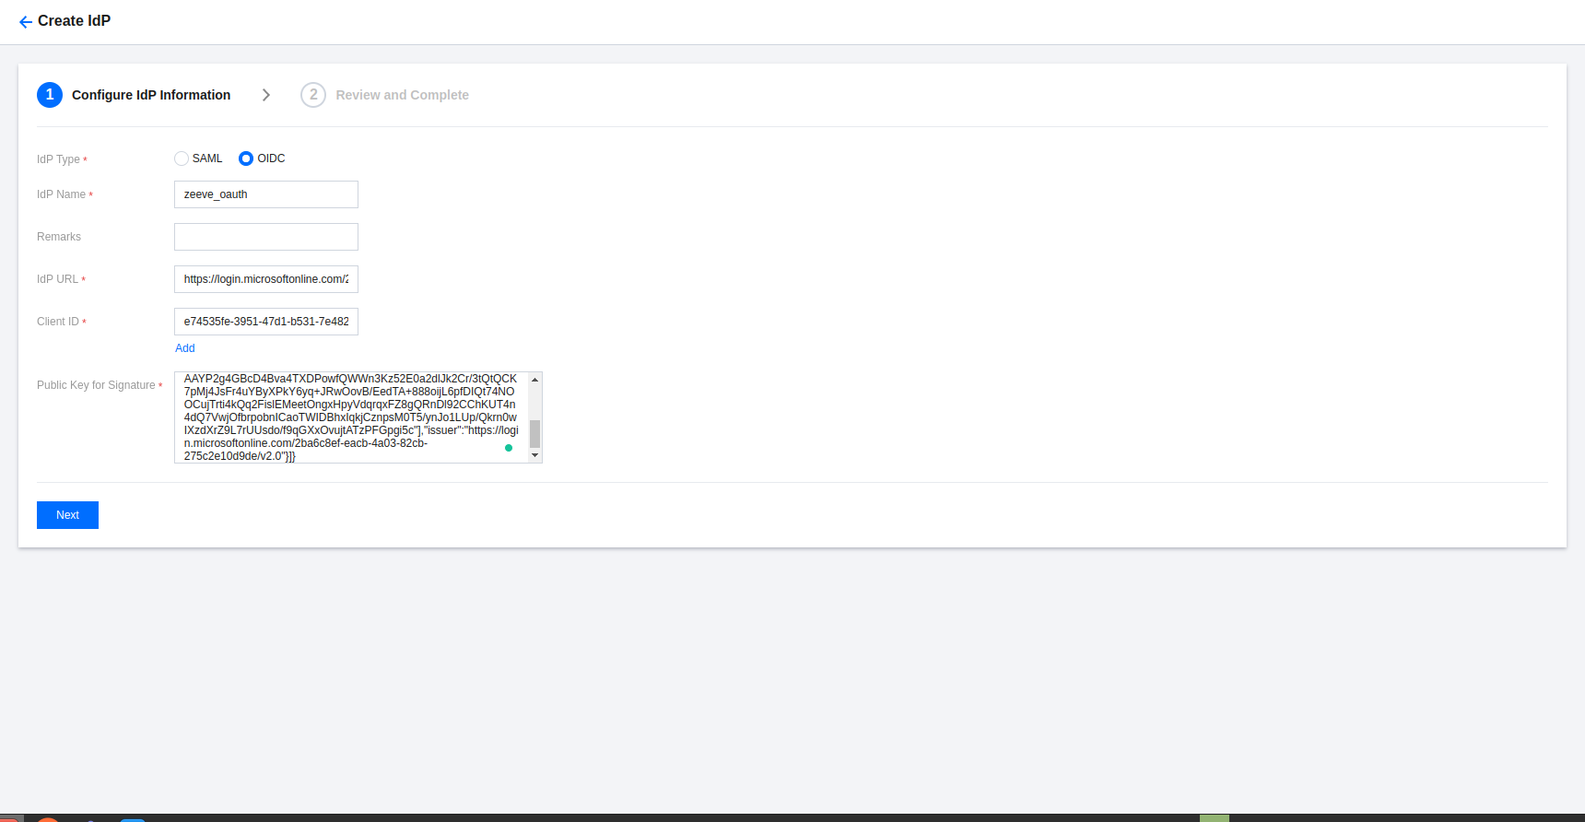
Confirm the information you entered and click Complete to save it.
Creating a role for the IdP
On the left sidebar in the CAM console, click Roles.
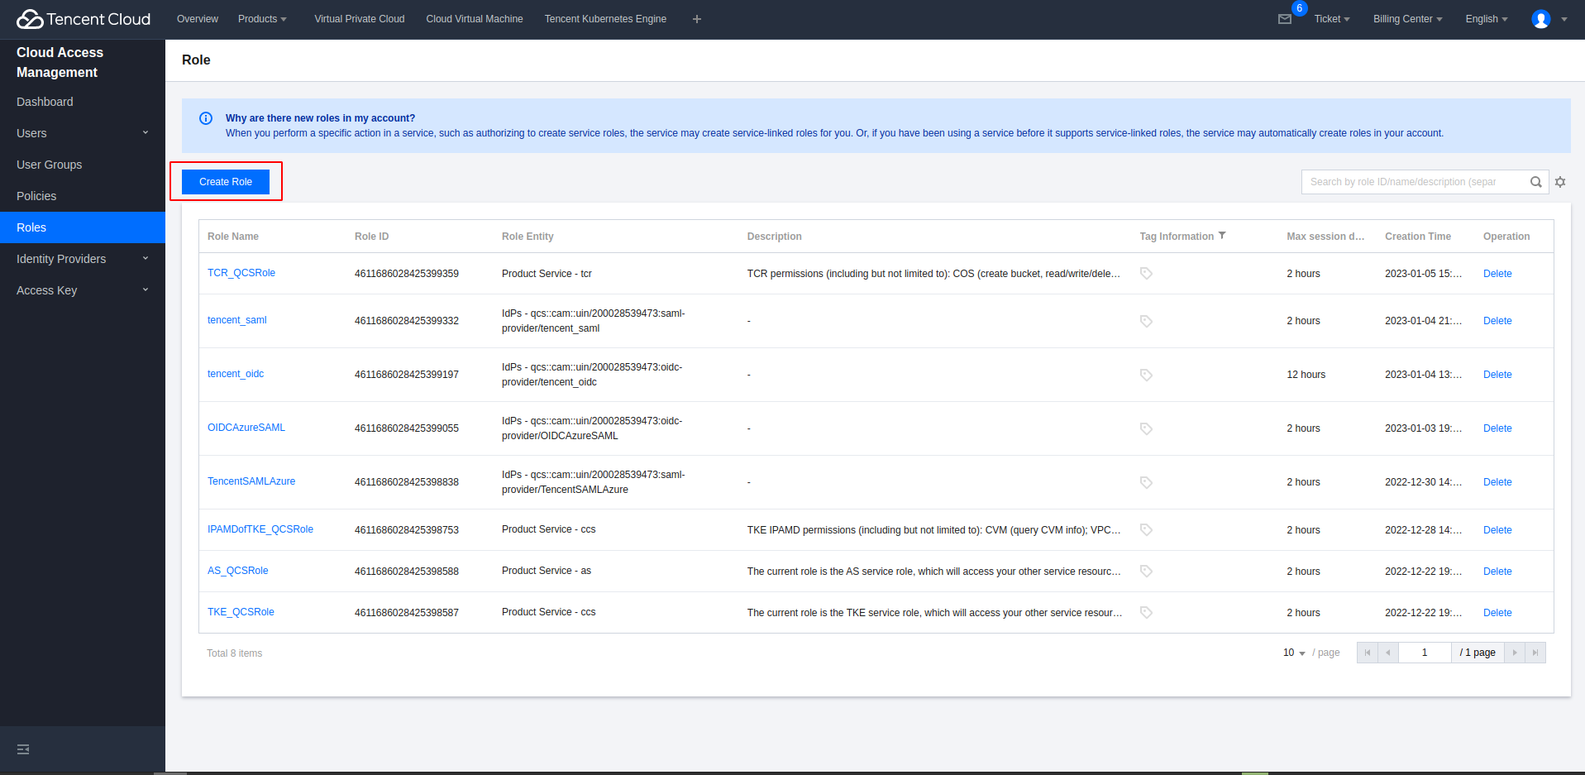
On the role management page, click Create Role.
Select IdPs as the role entity.
On the page you enter, select OIDC as the IdP type.
Select an IdP you created i.e zeeve_oauth.
Set conditions for the role:
oidc:aud:505b1146-13fe-4df6-927a-ca57321786fd
oidc:sub: Delete this.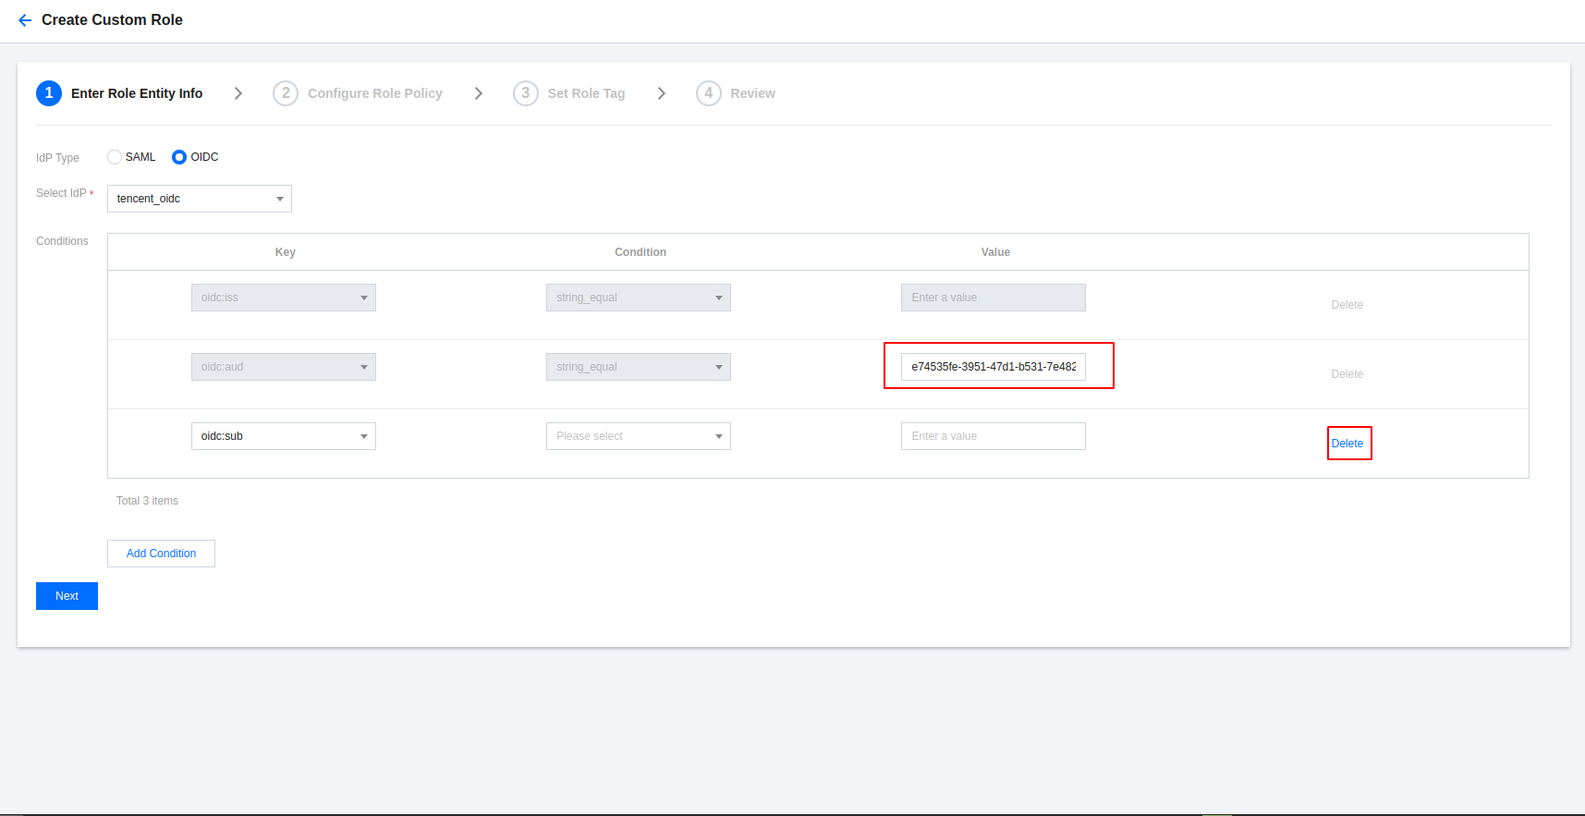
Click Next.
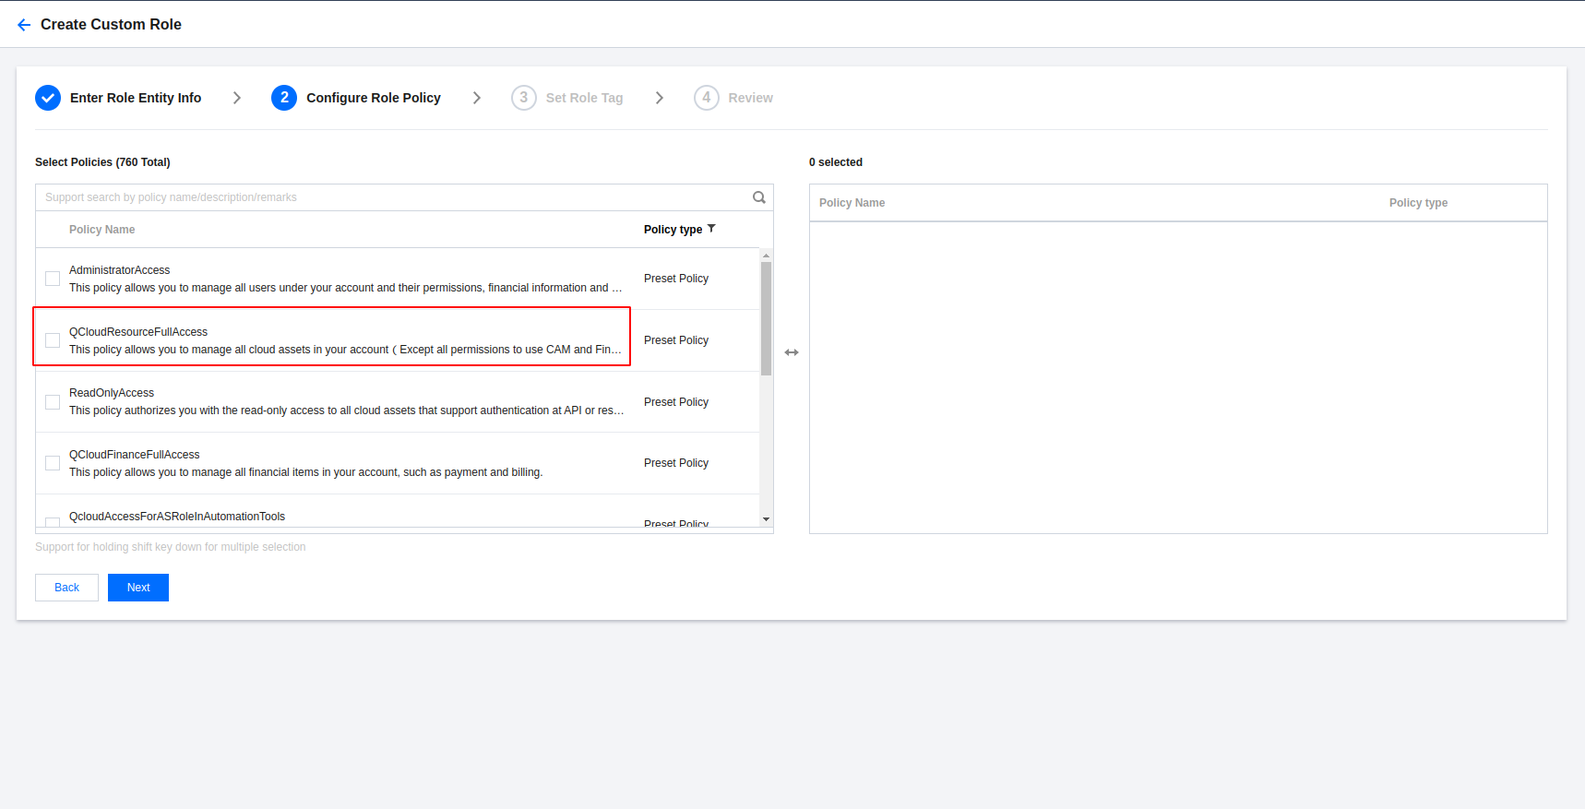
On the page you enter, associate the QCloudResourceFullAccess and the QCloudFinanceFullAccess policy with the role and click Next.
On the review page, enter the role name and role description (optional) and click Complete to save the above configurations.
Authorizing Cloud account
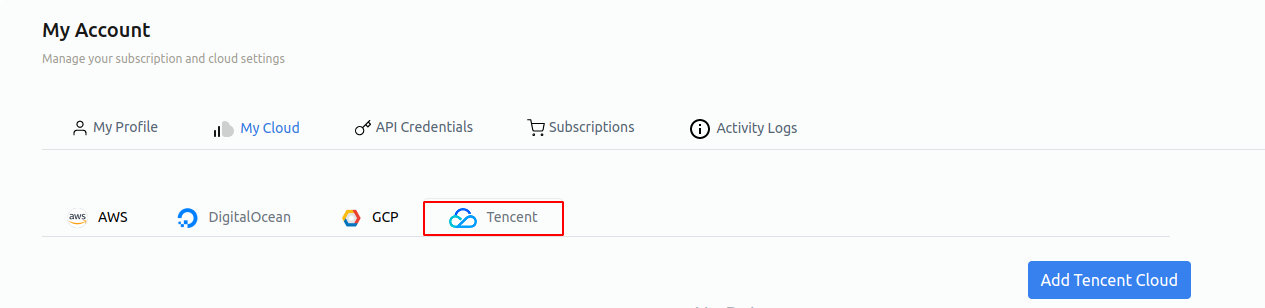
Hover on profile
Click on My Account
Click on My Cloud.
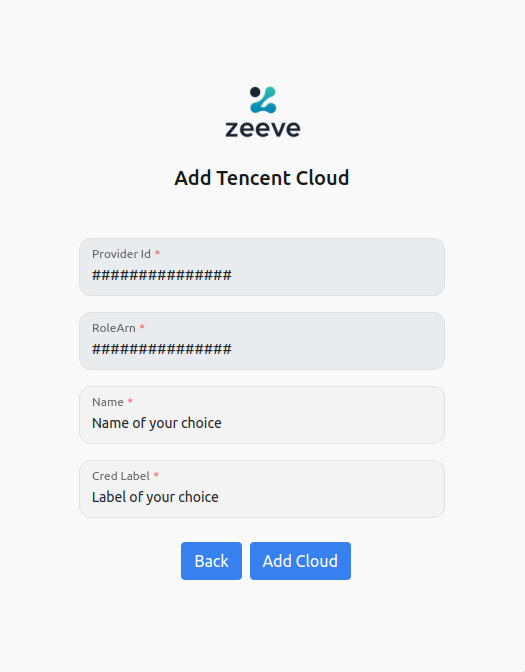
Click on Tencent and then click on Add Tencent Cloud.
Add the ProviderId and RoleARN that you have created in the previous steps.
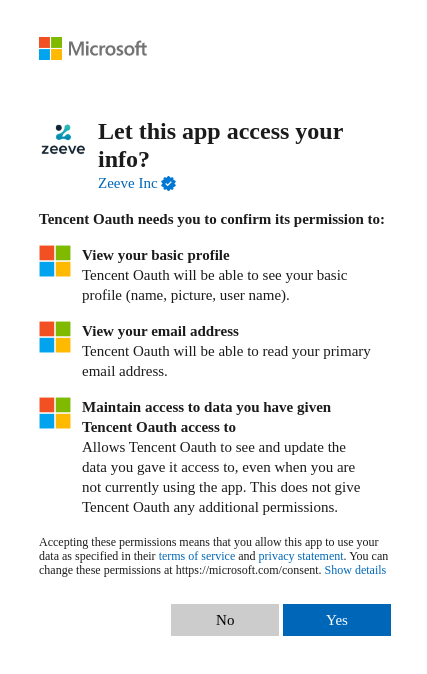
Login through any of your microsoft personal account, work account or you can add an account.

This will lead you to a consent screen where you will need to Accept the Terms & Conditions to allow Zeeve to use your credentials.